WooCommerce QuickBooks Desktop Integration: Import/Export Products
In our previous article we made a general overview of the WooCommerce Quickbooks Integration in Store Manager for WooCommerce.
Here we will provide a detailed guide on how to import and export products to QuickBooks to sync your inventory.
How to Export Products to QuickBooks
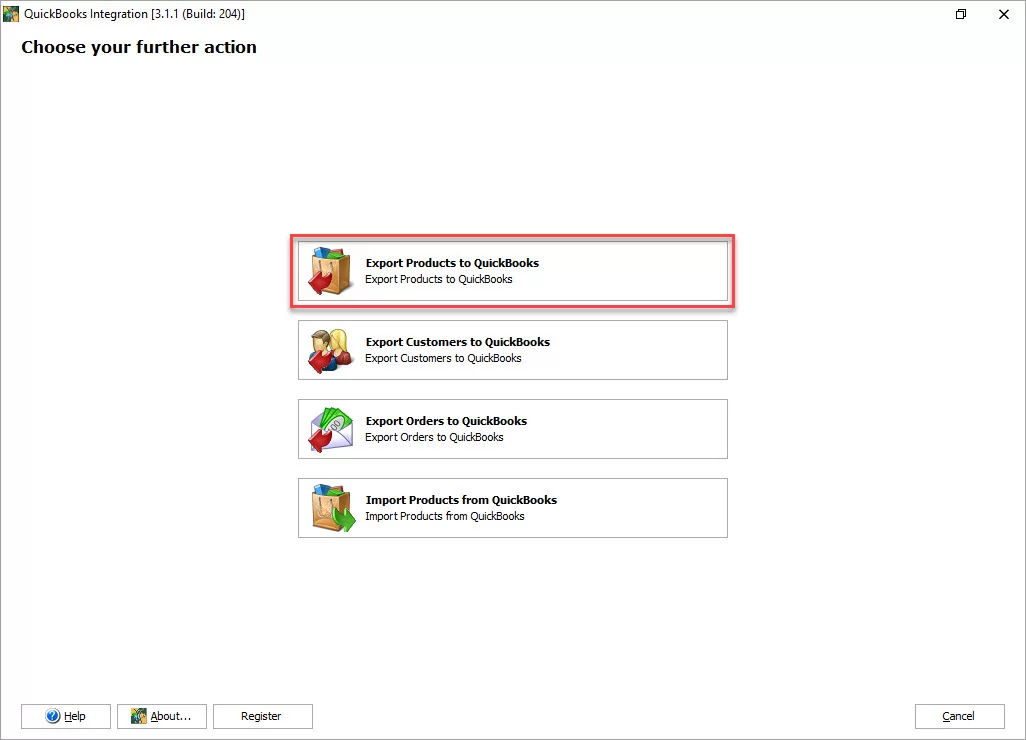
Click on the QuickBooks Integration icon to launch the addon. In the Welcome window, select “Export Products to QuickBooks”
Now follow the instructions of the wizard to complete the task successfully.
1. Select the Data That Will be Exported to QuickBooks
On the first step, you will see a list of products that will be exported to QuickBooks. If you want to proceed with it, click “Next”.
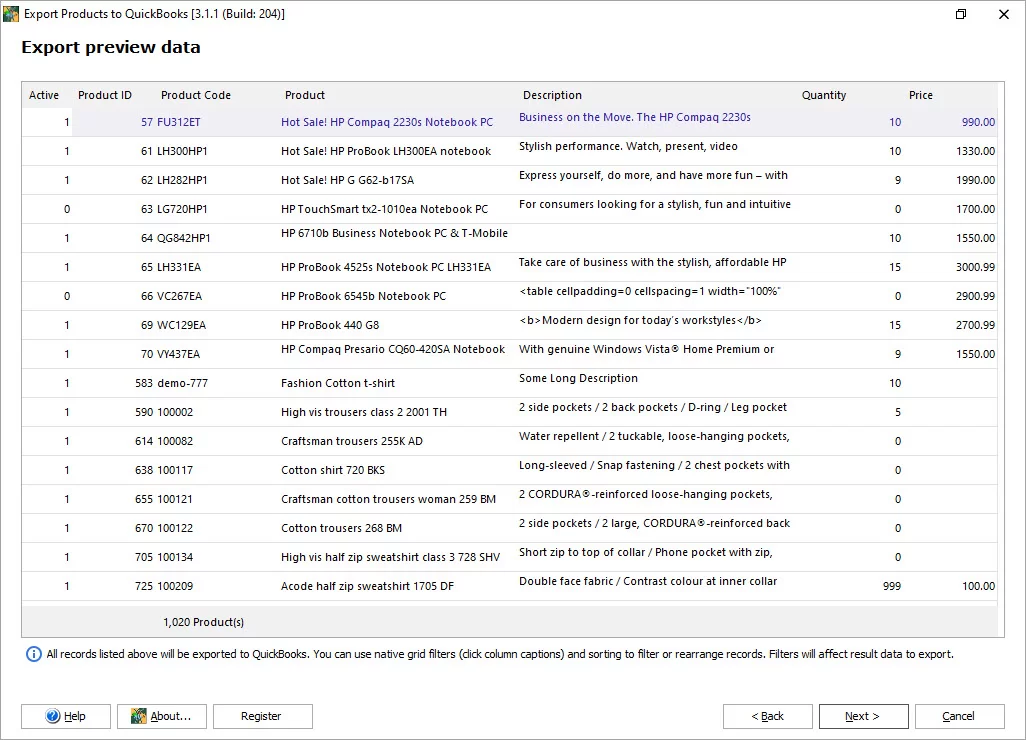
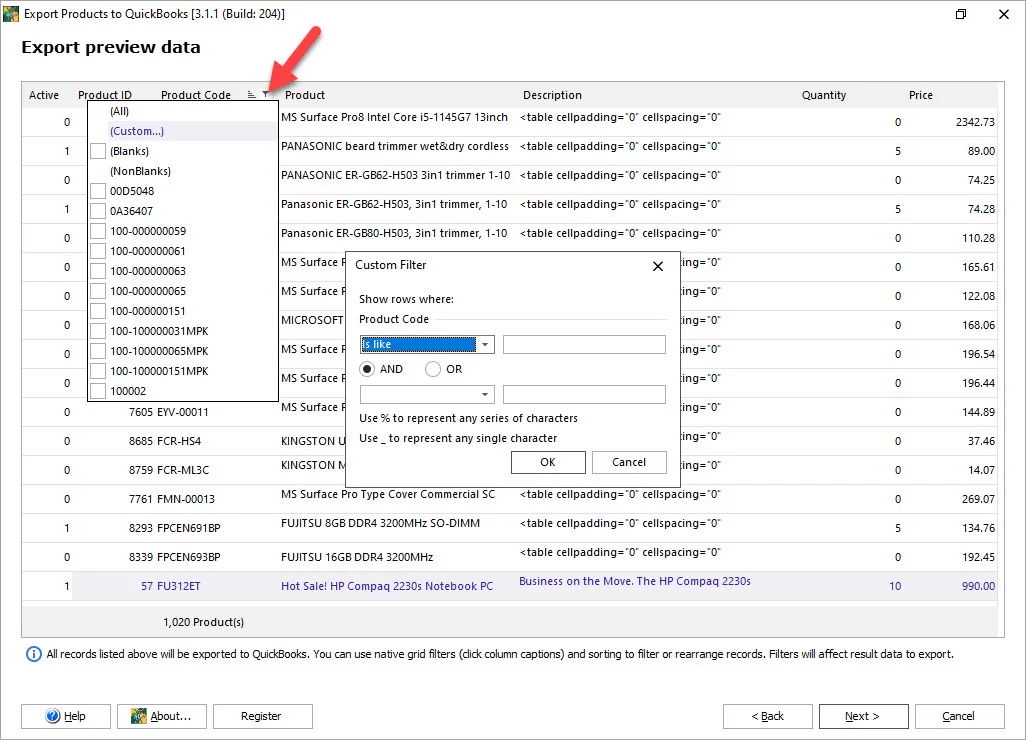
If you want to select certain products to export, use the filters: status (active or not), Product ID, Product Code (SKU), Product (name), Description, Quantity, Price.
How to export variable products to QuickBooks
You can sync products variations with QuickBooks as well. Though import/export of variations is not available in the QuickBooks Integration out of the box, you can set it up in a few steps.
First, locate the folder PluginsWorkFiles on your computer:
C:\Users\%username%\AppData\Local\eMagicOne Store Manager for WooCommerce\PluginsWorkFiles
When you open the folder, you'll see four files there:
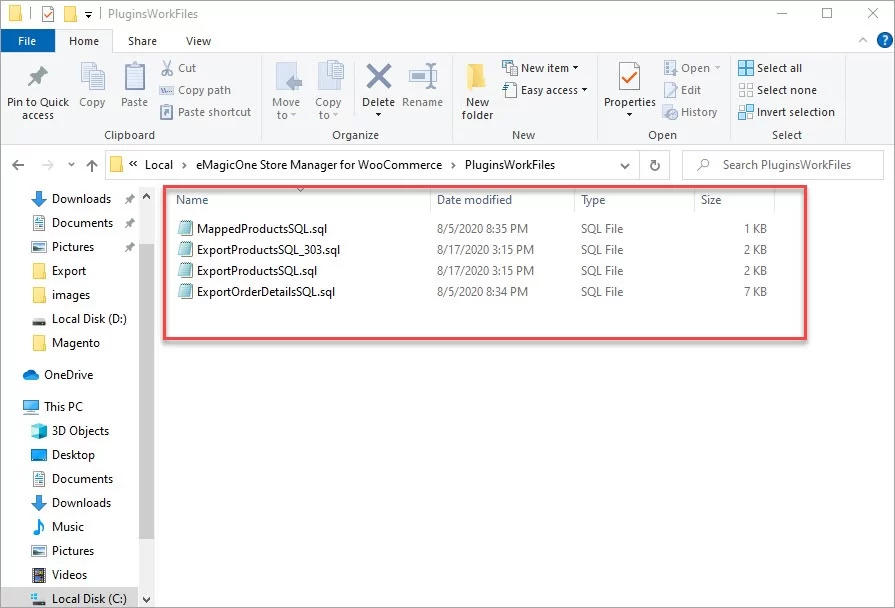
You will need to open files one by one using and replace existing contents with the one provided below. Use Notepad or other txt reader to open the files. Save the changes after pasting new contents.
Open MappedProductsSQL file with Notepad or other txt reader and replace existing code with the following (remember to save the changes):
SELECT T1.ID AS 'ProductID',
CAST(T1.post_title AS CHAR(255)) AS 'Product',
CAST(T2.meta_value AS CHAR(255)) AS 'ProductCode'

FROM /*SITE_PREFIX*/posts AS T1
LEFT JOIN /*SITE_PREFIX*/postmeta AS T2 ON (T2.post_id = T1.ID)
AND (T2.meta_key = '_sku')

WHERE ( (T1.post_type = 'product') OR (T1.post_type = 'product_variation') )
AND (T1.post_status IN ('publish', 'private', 'pending', 'draft'))
AND (T1.post_status <> 'auto-draft')
/*FILTER*/

GROUP BY T1.ID
ORDER BY T1.ID
Open ExportProductsSQL_303 file with Notepad or other txt reader and replace existing code with the following (remember to save the changes):
SELECT
T1.ID AS 'ProductID',
IF(T1.post_type = 'product_variation', T9.meta_value, T1.post_content) AS 'Description',
CAST(T1.post_title AS CHAR(255)) AS 'Product',
IF(T7.meta_value = 'yes', IF(T5.meta_value > 0, 1, IF(T8.`meta_value` = 'no', 0, 1)), IF(T2.meta_value = 'outofstock', 0, 1)) AS 'Active',
CAST(T3.meta_value AS CHAR(255)) AS 'ProductCode',
CAST(T4.meta_value AS SIGNED) AS 'Weight',
CAST(T5.meta_value AS SIGNED) AS 'Quantity',
CAST(T6.meta_value AS DECIMAL(20,6)) AS 'Price'

FROM /*SITE_PREFIX*/posts AS T1
LEFT JOIN /*SITE_PREFIX*/postmeta AS T2 ON (T2.post_id = T1.ID)
AND (T2.meta_key = '_stock_status')
LEFT JOIN /*SITE_PREFIX*/postmeta AS T3 ON (T3.post_id = T1.ID)
AND (T3.meta_key = '_sku')
LEFT JOIN /*SITE_PREFIX*/postmeta AS T4 ON (T4.post_id = T1.ID)
AND (T4.meta_key = '_weight')
LEFT JOIN /*SITE_PREFIX*/postmeta AS T5 ON (T5.post_id = T1.ID)
AND (T5.meta_key = '_stock')
LEFT JOIN /*SITE_PREFIX*/postmeta AS T6 ON (T6.post_id = T1.ID)
AND (T6.meta_key = '_regular_price')
LEFT JOIN /*SITE_PREFIX*/postmeta AS T7 ON (T7.post_id = T1.ID)
AND (T7.meta_key = '_manage_stock')
LEFT JOIN /*SITE_PREFIX*/postmeta AS T8 ON (T8.post_id = T1.ID)
AND (T8.meta_key = '_backorders')
LEFT JOIN /*PREFIX*/postmeta AS T9 ON (T9.post_id = T1.ID)
AND (T9.meta_key = '_variation_description')

WHERE ( (T1.post_type = 'product') OR (T1.post_type = 'product_variation') )
AND (T1.post_status IN ('publish', 'private', 'pending', 'draft'))
AND (T1.post_status <> 'auto-draft')
/*FILTER*/
GROUP BY T1.ID
ORDER BY T1.ID
Open ExportProductsSQL file with Notepad or other txt reader and replace existing code with the following (remember to save the changes):
SELECT
T1.ID AS 'ProductID',
IF(T1.post_type = 'product_variation', T7.meta_value, T1.post_content) AS 'Description',
CAST(T1.post_title AS CHAR(255)) AS 'Product',
IF(T2.meta_value = 'instock', 1, 0) AS 'Active',
CAST(T3.meta_value AS CHAR(255)) AS 'ProductCode',
CAST(T4.meta_value AS SIGNED) AS 'Weight',
CAST(T5.meta_value AS SIGNED) AS 'Quantity',
CAST(T6.meta_value AS DECIMAL(20,6)) AS 'Price'

FROM /*SITE_PREFIX*/posts AS T1
LEFT JOIN /*SITE_PREFIX*/postmeta AS T2 ON (T2.post_id = T1.ID)
AND (T2.meta_key = '_stock_status')
LEFT JOIN /*SITE_PREFIX*/postmeta AS T3 ON (T3.post_id = T1.ID)
AND (T3.meta_key = '_sku')
LEFT JOIN /*SITE_PREFIX*/postmeta AS T4 ON (T4.post_id = T1.ID)
AND (T4.meta_key = '_weight')
LEFT JOIN /*SITE_PREFIX*/postmeta AS T5 ON (T5.post_id = T1.ID)
AND (T5.meta_key = '_stock')
LEFT JOIN /*SITE_PREFIX*/postmeta AS T6 ON (T6.post_id = T1.ID)
AND (T6.meta_key = '_regular_price')
LEFT JOIN /*PREFIX*/postmeta AS T7 ON (T7.post_id = T1.ID)
AND (T7.meta_key = '_variation_description')

WHERE ( (T1.post_type = 'product') OR (T1.post_type = 'product_variation') )
AND (T1.post_status IN ('publish', 'private', 'pending', 'draft'))
AND (T1.post_status <> 'auto-draft')
/*FILTER*/

GROUP BY T1.ID
ORDER BY T1.ID
Open ExportOrderDetailsSQL file with Notepad or other txt reader and replace existing code with the following (remember to save the changes):
SELECT
T1.ID AS 'OrderID',
T3.user_email AS 'Name',
T1.post_date AS 'Date',
T4.meta_value AS 'FirstName',
T5.meta_value AS 'LastName',
TRIM(CONCAT(T4.meta_value, ' ', T5.meta_value)) AS 'CustomerName',
T6.meta_value AS 'Company',
TRIM(CONCAT(T7.meta_value, ' ', T8.meta_value)) AS 'BillToContact',
T9.meta_value AS 'BillAddressAddr1',
T10.meta_value AS 'BillAddressAddr2',
T11.meta_value AS 'BillAddressCity',
T12.meta_value AS 'BillAddressState',
T13.meta_value AS 'BillAddressCountry',
T14.meta_value AS 'BillAddressPostalCode',
TRIM(CONCAT(T15.meta_value, ' ', T16.meta_value)) AS 'ShipToName',
T17.meta_value AS 'ShipAddressAddr1',
T18.meta_value AS 'ShipAddressAddr2',
T19.meta_value AS 'ShipAddressCity',
T20.meta_value AS 'ShipAddressState',
T21.meta_value AS 'ShipAddressCountry',
T22.meta_value AS 'ShipAddressPostalCode',
T23.meta_value AS 'Phone',
TRIM(SPACE(32)) AS 'Fax',
T3.user_email AS 'Email',
TRIM(SPACE(32)) AS 'WebAddress',
T25.meta_value AS 'ProductID',
CAST((T26.meta_value / T27.meta_value) AS DECIMAL(20,2)) AS 'OrderedPrice',
T27.meta_value AS 'Quantity',
IF(T39.meta_value <> 0, T40.meta_value, T28.meta_value) AS 'ProductCode',
T24.order_item_name AS 'Product',
CAST((T26.meta_value / T27.meta_value) AS DECIMAL(20,2)) AS 'Price',
CAST((T29.meta_value + T30.meta_value) AS DECIMAL(20,2)) AS 'Discount',
CAST((T31.meta_value - T32.meta_value - T33.meta_value - T34.meta_value + T35.meta_value) AS DECIMAL(20,2)) AS 'Subtotal',
CAST(T34.meta_value AS DECIMAL(20,2)) AS 'Tax',
CAST((T32.meta_value + T33.meta_value) AS DECIMAL(20,2)) AS 'ShippingCost',
CAST(T31.meta_value AS DECIMAL(20,2)) AS 'Total',
T37.meta_value AS 'PaymentMethod',
T38.order_item_name AS 'ShippingMethod'

FROM /*SITE_PREFIX*/posts T1
LEFT JOIN /*SITE_PREFIX*/postmeta T2 ON (T2.post_id = T1.ID) AND (T2.meta_key = '_customer_user')
LEFT JOIN /*PREFIX*/users T3 ON (T3.ID = T2.meta_value)
LEFT JOIN /*PREFIX*/usermeta T4 ON (T4.user_id = T3.ID) AND (T4.meta_key = 'first_name')
LEFT JOIN /*PREFIX*/usermeta T5 ON (T5.user_id = T3.ID) AND (T5.meta_key = 'last_name')
LEFT JOIN /*SITE_PREFIX*/postmeta T6 ON (T6.post_id = T1.ID) AND (T6.meta_key = '_shipping_company')
LEFT JOIN /*SITE_PREFIX*/postmeta T7 ON (T7.post_id = T1.ID) AND (T7.meta_key = '_billing_first_name')
LEFT JOIN /*SITE_PREFIX*/postmeta T8 ON (T8.post_id = T1.ID) AND (T8.meta_key = '_billing_last_name')
LEFT JOIN /*SITE_PREFIX*/postmeta T9 ON (T9.post_id = T1.ID) AND (T9.meta_key = '_billing_address_1')
LEFT JOIN /*SITE_PREFIX*/postmeta T10 ON (T10.post_id = T1.ID) AND (T10.meta_key = '_billing_address_2')
LEFT JOIN /*SITE_PREFIX*/postmeta T11 ON (T11.post_id = T1.ID) AND (T11.meta_key = '_billing_city')
LEFT JOIN /*SITE_PREFIX*/postmeta T12 ON (T12.post_id = T1.ID) AND (T12.meta_key = '_billing_state')
LEFT JOIN /*SITE_PREFIX*/postmeta T13 ON (T13.post_id = T1.ID) AND (T13.meta_key = '_billing_country')
LEFT JOIN /*SITE_PREFIX*/postmeta T14 ON (T14.post_id = T1.ID) AND (T14.meta_key = '_billing_postcode')
LEFT JOIN /*SITE_PREFIX*/postmeta T15 ON (T15.post_id = T1.ID) AND (T15.meta_key = '_shipping_first_name')
LEFT JOIN /*SITE_PREFIX*/postmeta T16 ON (T16.post_id = T1.ID) AND (T16.meta_key = '_shipping_last_name')
LEFT JOIN /*SITE_PREFIX*/postmeta T17 ON (T17.post_id = T1.ID) AND (T17.meta_key = '_shipping_address_1')
LEFT JOIN /*SITE_PREFIX*/postmeta T18 ON (T18.post_id = T1.ID) AND (T18.meta_key = '_shipping_address_2')
LEFT JOIN /*SITE_PREFIX*/postmeta T19 ON (T19.post_id = T1.ID) AND (T19.meta_key = '_shipping_city')
LEFT JOIN /*SITE_PREFIX*/postmeta T20 ON (T20.post_id = T1.ID) AND (T20.meta_key = '_shipping_state')
LEFT JOIN /*SITE_PREFIX*/postmeta T21 ON (T21.post_id = T1.ID) AND (T21.meta_key = '_shipping_country')
LEFT JOIN /*SITE_PREFIX*/postmeta T22 ON (T22.post_id = T1.ID) AND (T22.meta_key = '_shipping_postcode')
LEFT JOIN /*SITE_PREFIX*/postmeta T23 ON (T23.post_id = T1.ID) AND (T23.meta_key = '_billing_phone')
LEFT JOIN /*SITE_PREFIX*/woocommerce_order_items T24 ON (T24.order_id = T1.ID) AND (T24.order_item_type = 'line_item')
LEFT JOIN /*SITE_PREFIX*/woocommerce_order_itemmeta T25 ON (T25.order_item_id = T24.order_item_id) AND (T25.meta_key = '_product_id')
LEFT JOIN /*SITE_PREFIX*/woocommerce_order_itemmeta T39 ON (T39.order_item_id = T24.order_item_id) AND (T39.meta_key = '_variation_id')
LEFT JOIN /*SITE_PREFIX*/woocommerce_order_itemmeta T26 ON (T26.order_item_id = T24.order_item_id) AND (T26.meta_key = '_line_subtotal')
LEFT JOIN /*SITE_PREFIX*/woocommerce_order_itemmeta T27 ON (T27.order_item_id = T24.order_item_id) AND (T27.meta_key = '_qty')
LEFT JOIN /*SITE_PREFIX*/postmeta T28 ON (T28.post_id = T25.meta_value) AND (T28.meta_key = '_sku')
LEFT JOIN /*SITE_PREFIX*/postmeta T40 ON (T40.post_id = T39.meta_value) AND (T40.meta_key = '_sku')
LEFT JOIN /*SITE_PREFIX*/postmeta T29 ON (T29.post_id = T1.ID) AND (T29.meta_key = '_cart_discount')
LEFT JOIN /*SITE_PREFIX*/postmeta T30 ON (T30.post_id = T1.ID) AND (T30.meta_key = '_cart_discount_tax')
LEFT JOIN /*SITE_PREFIX*/postmeta T31 ON (T31.post_id = T1.ID) AND (T31.meta_key = '_order_total')
LEFT JOIN /*SITE_PREFIX*/postmeta T32 ON (T32.post_id = T1.ID) AND (T32.meta_key = '_order_shipping')
LEFT JOIN /*SITE_PREFIX*/postmeta T33 ON (T33.post_id = T1.ID) AND (T33.meta_key = '_order_shipping_tax')
LEFT JOIN /*SITE_PREFIX*/postmeta T34 ON (T34.post_id = T1.ID) AND (T34.meta_key = '_order_tax')
LEFT JOIN /*SITE_PREFIX*/postmeta T35 ON (T35.post_id = T1.ID) AND (T35.meta_key = '_cart_discount')
LEFT JOIN /*SITE_PREFIX*/postmeta T36 ON (T36.post_id = T1.ID) AND (T36.meta_key = '_cart_discount_tax')
LEFT JOIN /*SITE_PREFIX*/postmeta T37 ON (T37.post_id = T1.ID) AND (T37.meta_key = '_payment_method_title')
LEFT JOIN /*SITE_PREFIX*/woocommerce_order_items T38 ON (T38.order_id = T1.ID) AND (T38.order_item_type = 'shipping')

WHERE (T1.post_type = 'shop_order') AND (T1.post_status <> 'auto-draft')
/*FILTER*/
GROUP BY T24.order_item_id
ORDER BY T1.ID, T24.order_item_id
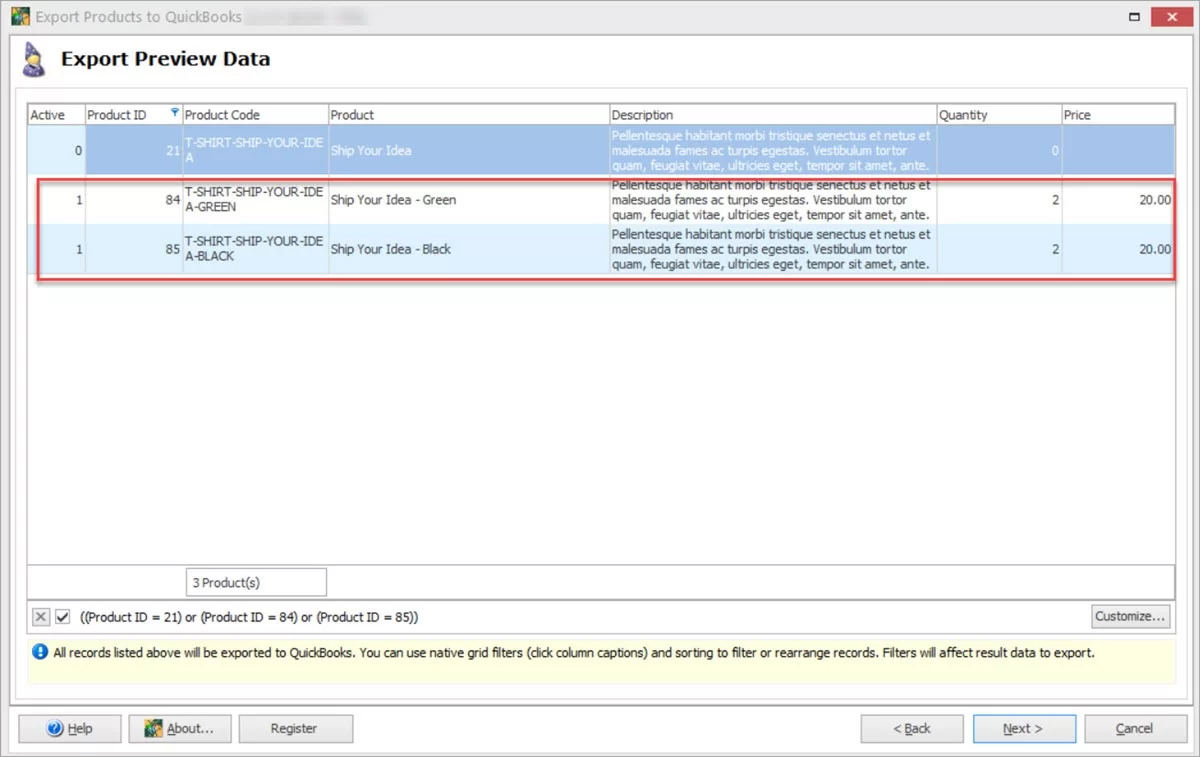
After you’ve replaced the contents of all files, relaunch the QuickBooks Integration. Now, you will be able to export product variations, each variation with its own SKU:
2. Specify Export Options
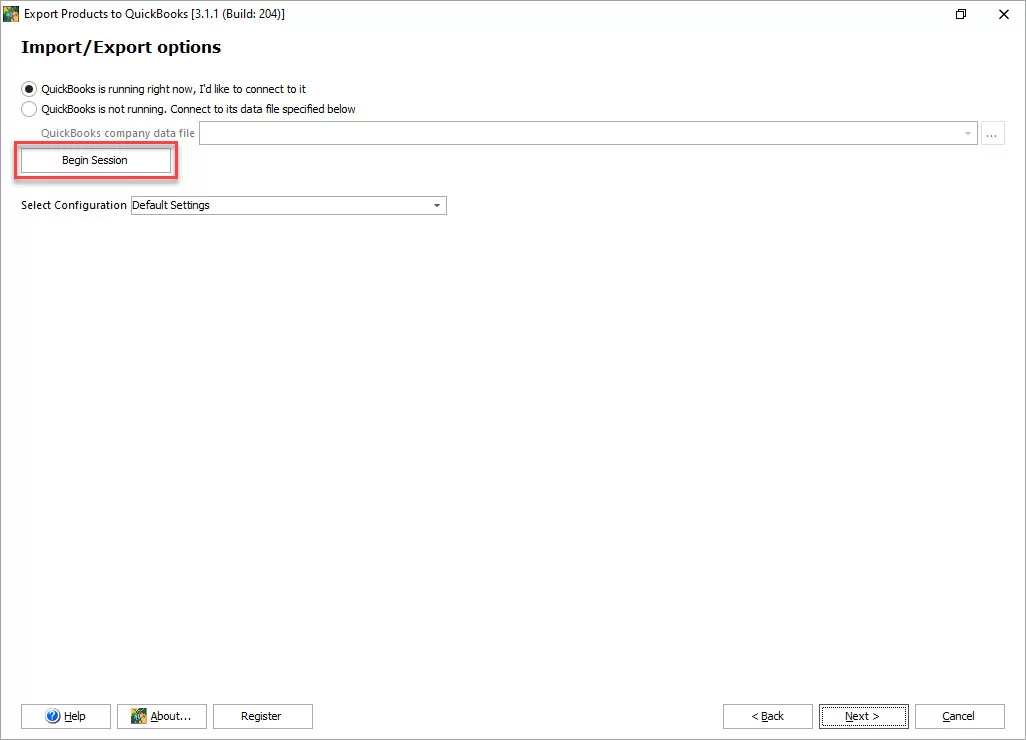
Now, let's get back to the export. After you’ve selected the products, proceed with the export options.
But first you have to connect to Quickbooks. Select one of the options and press “Begin session”:
When the addon have connected to your Quickbooks software, you will see available options. Here is what they stand for.
- Export method – select whether to create new products, modify existing, or do both.
- Set default tax – check the option to enable it.
If you select the “Set default tax” check box, there will appear the drop-down with two options — Taxable sales and Non-Taxable sales:
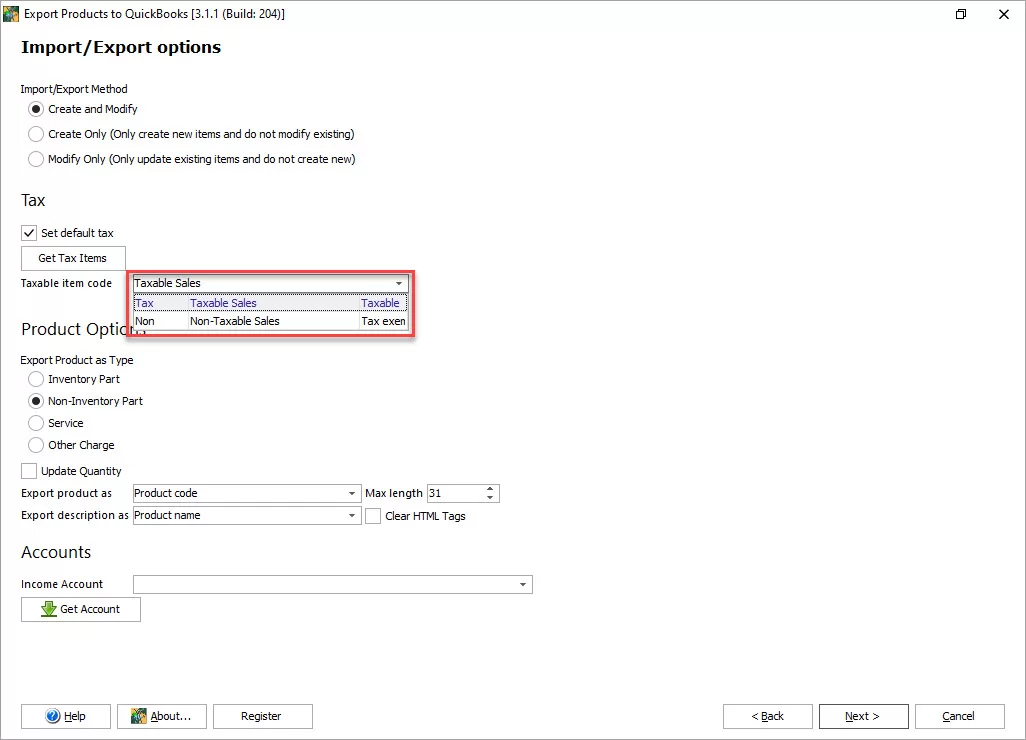
If you’ve selected “Taxable Sales”, specify a tax code that will be assigned to the products. If a taxable item code list is empty, press “Get tax items” to retrieve a list of taxes from QuickBooks.
- Export product as type – select the type of QuickBooks inventory to update (Inventory Part, Non-Inventory part, Service, Other Charge).
- Update quantity – check the option to update products' quantity in QuickBooks.
- Export product as – the dropdown has three options: Product ID, Product code (SKU), Product name. Choose the entity that will serve as Name in QuickBooks.
- Max length – set the limit for the characters in the Item name (product).
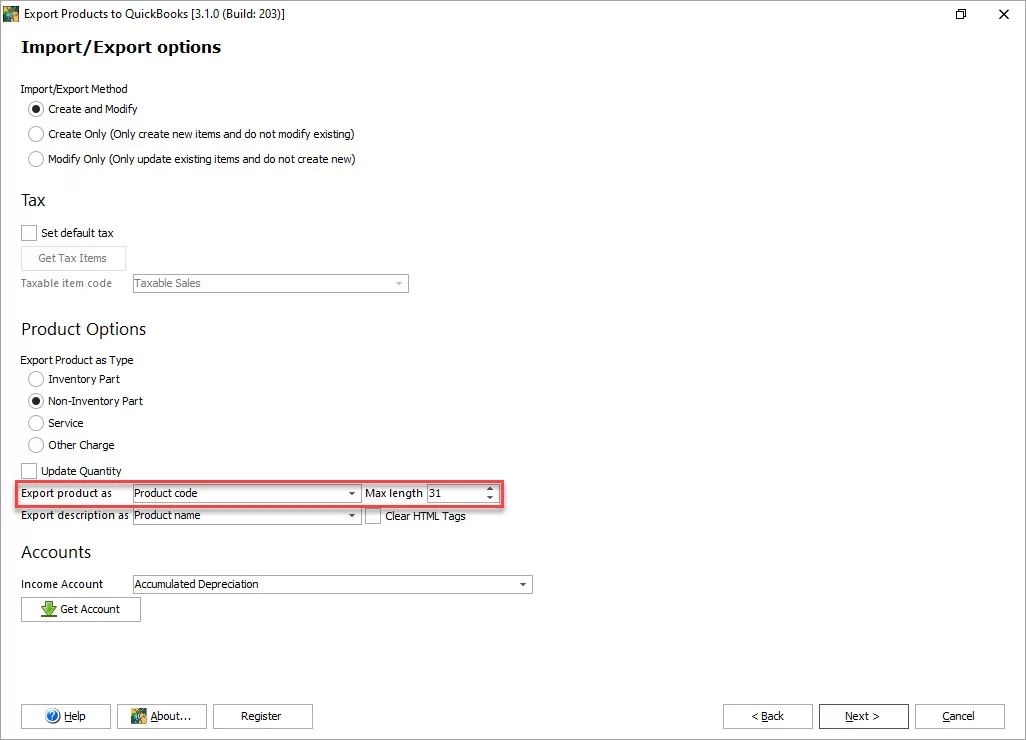
- Export description as – similarly, select appropriate field (Product name or product description) that will serve as Description in QuickBooks.
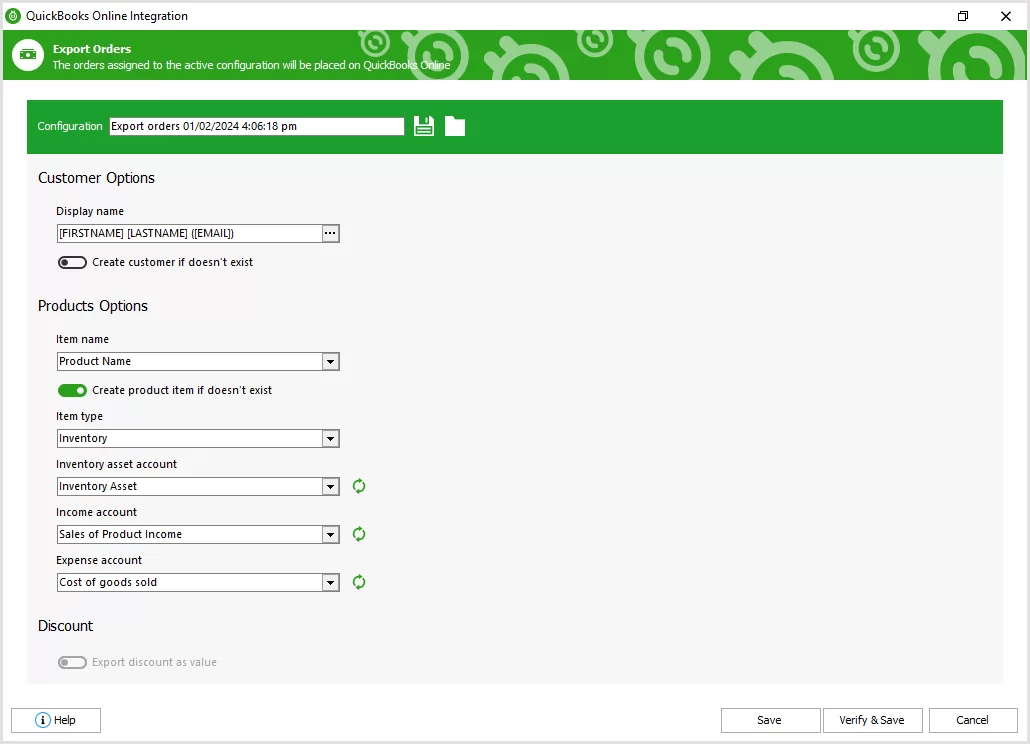
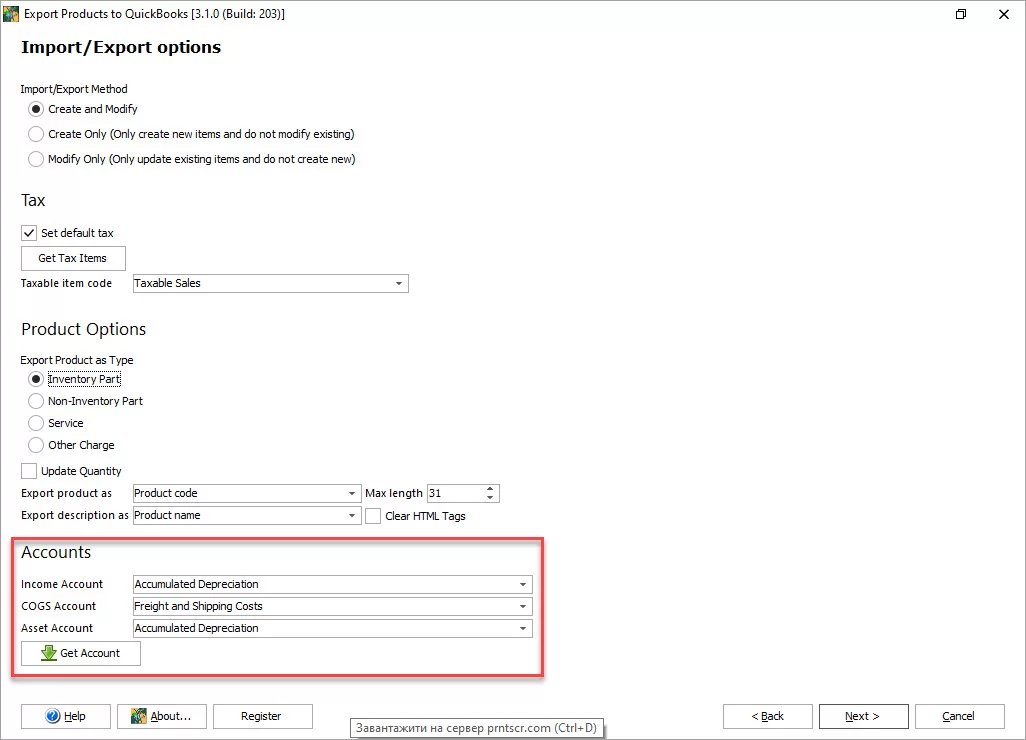
- Income Account – if you export inventory products you will be offered to specify the income account. So, specify the account that will be assigned to the items. If the Accounts list is empty, click the arrow icon to retrieve existing accounts from QuickBooks:
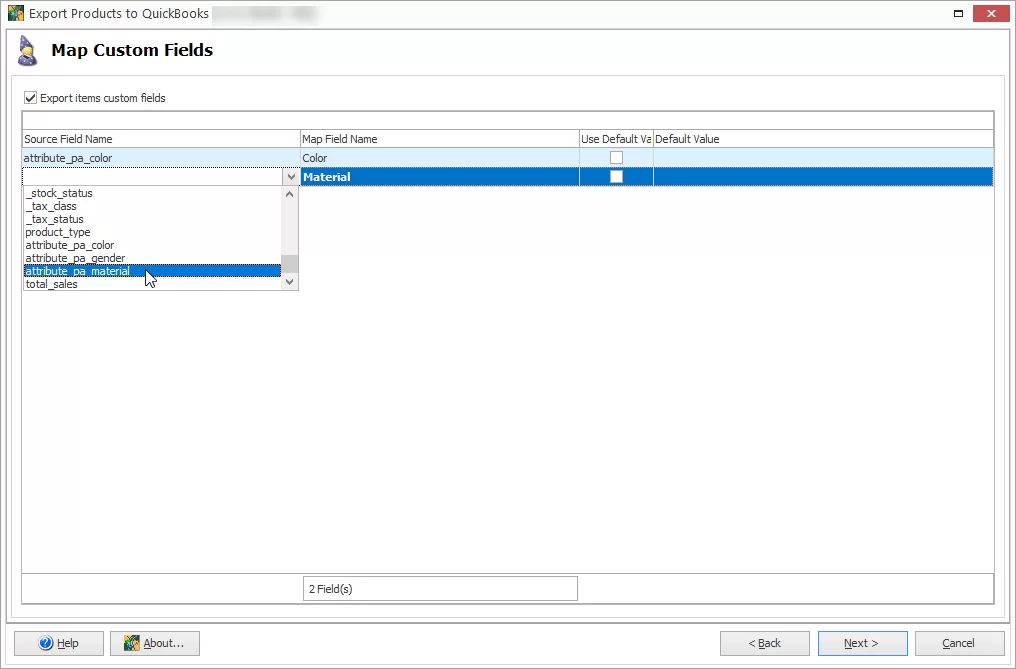
3. Map Custom Fields
If the items in your QuickBooks account have custom fields (like color, material), and you would like to fill them during the export, you can pick matching fields from your store database. To do so, check the option “Export items custom list” and select appropriate fields from your store database:
4. Map Products Between WooCommerce and QuickBooks
If you already have some products on QuickBooks, map the products from your store to them.
Use the “AutoFill” option to map products automatically. The addon will search for matching products across both systems by product ID, name, or SKUs match.
If matching products weren’t found, you can map them manually:
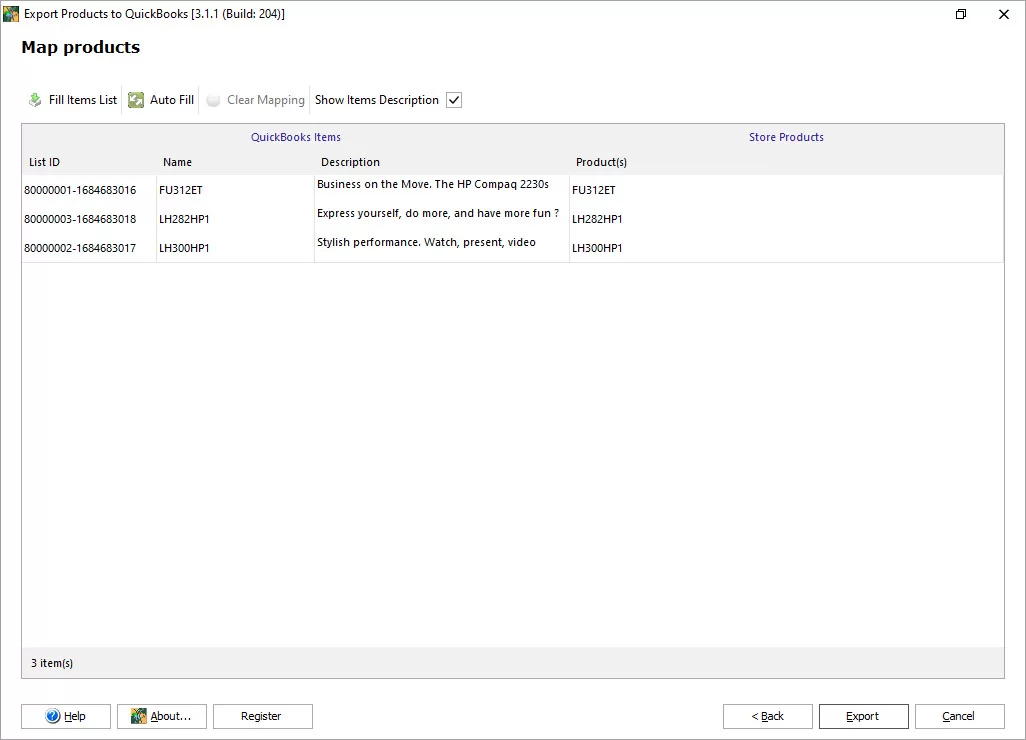
When you’ve specified all settings, press “Export.”
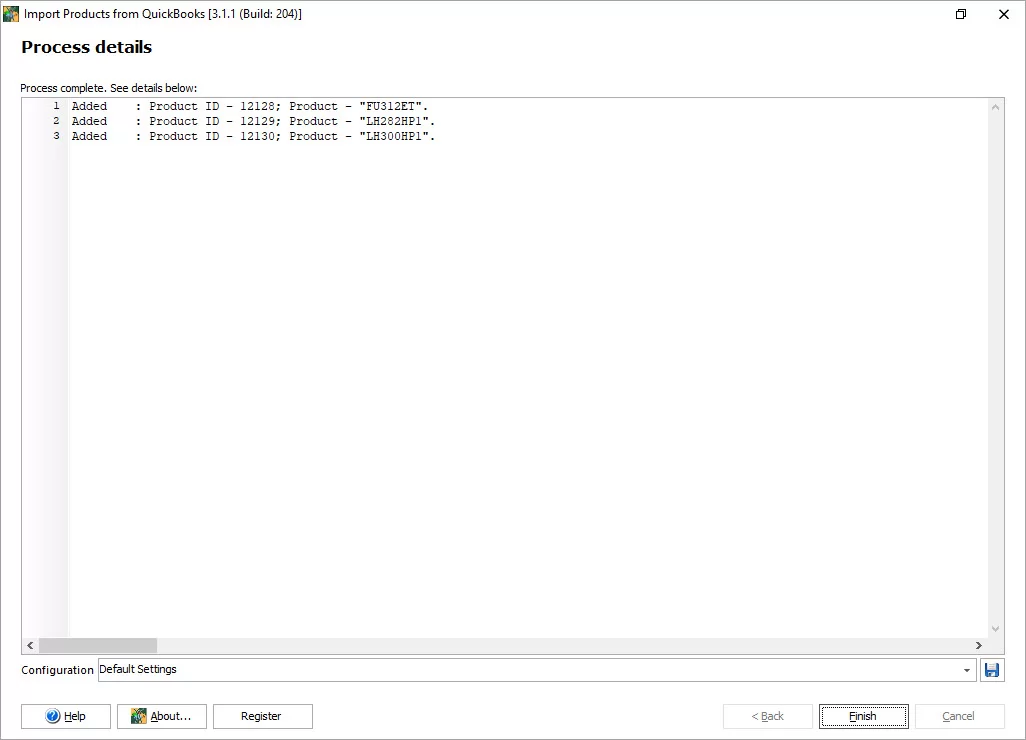
5. Complete the Export and check Items in QuickBooks
After it the export is complete, you will see a window showing what products were modified or added:
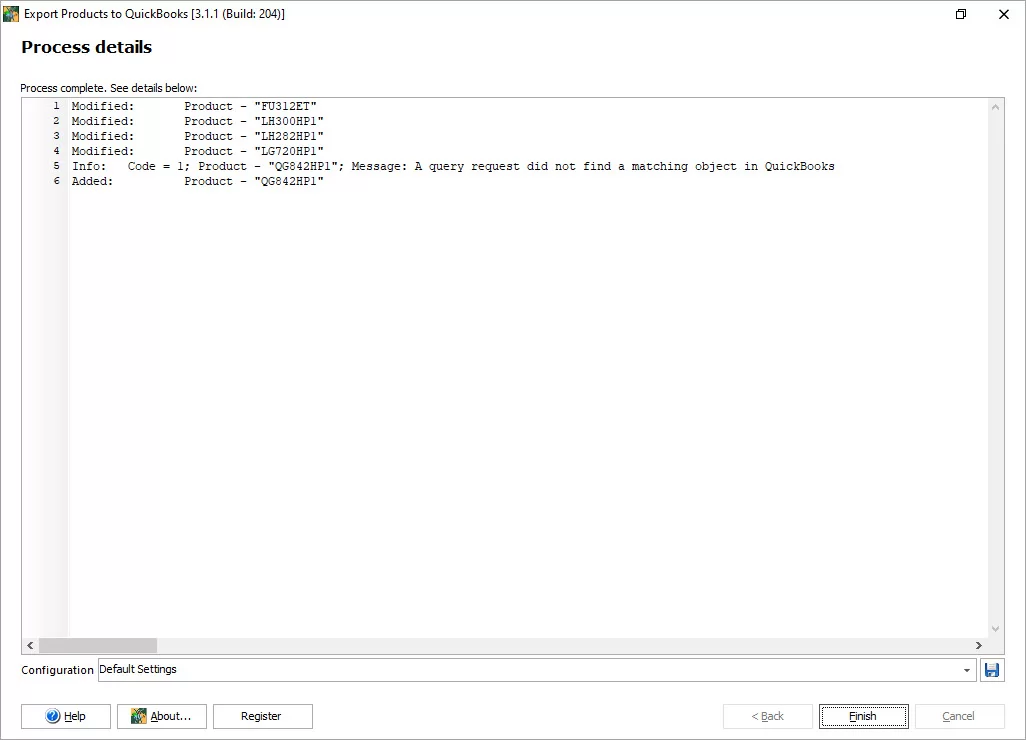
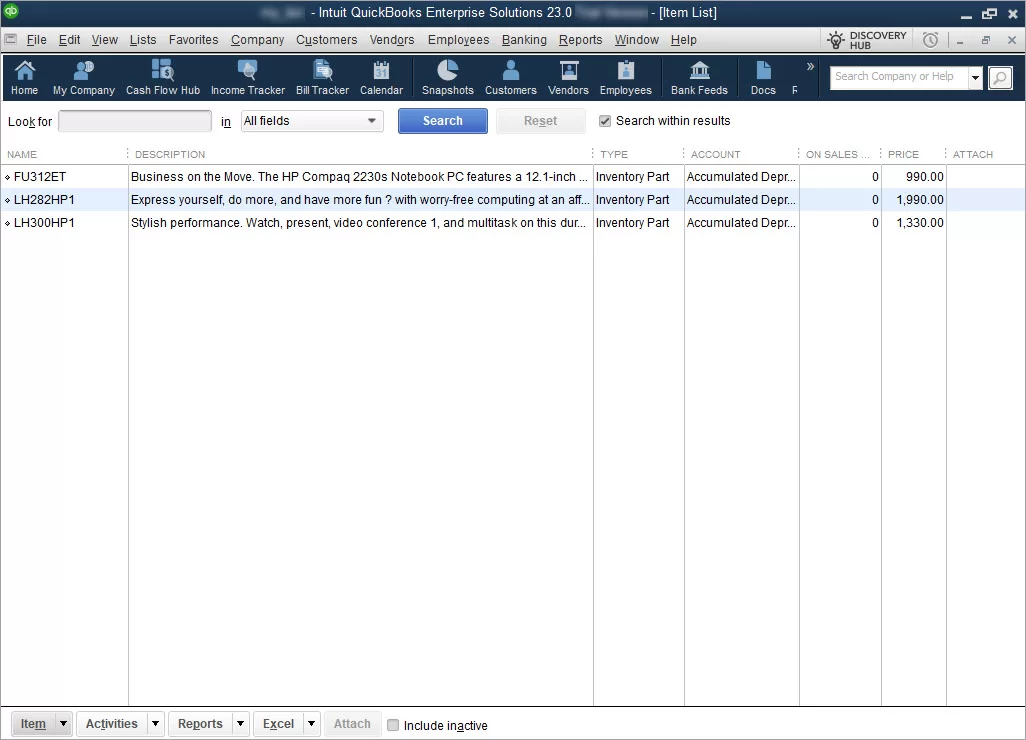
Press “Finish” and check the exported data in QuickBooks:
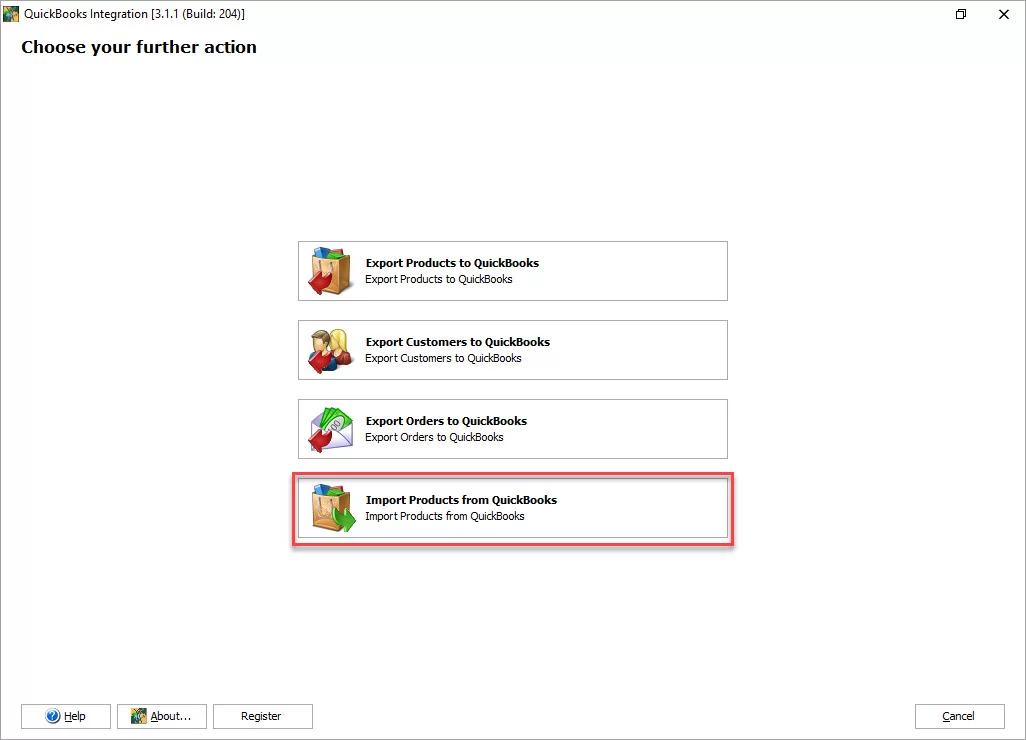
Import Products from QuickBooks to WooCommerce
The Product Import option allows you to transfer data from QuickBooks to add or update products in your WooCommerce store.
To begin the import, launch QuickBooks Integration and select the “Import Products from QuickBooks” option:
The Import Wizard is pretty similar to the export allowing you to:
- Create new products, modify existing or do both.
- Update the following fields: product name, price, quantity and description.
- Select the type of QuickBooks inventory to update.
- Decide whether to update empty fields.
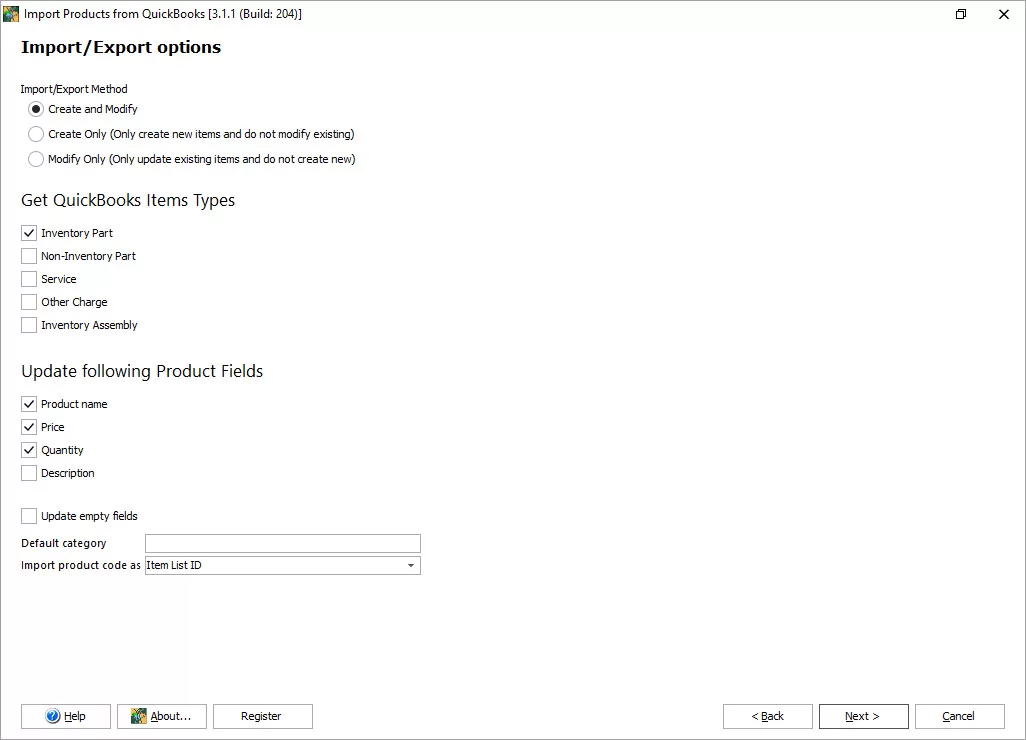
In this window, you must specify the Default category into which products from QuickBooks will be imported:
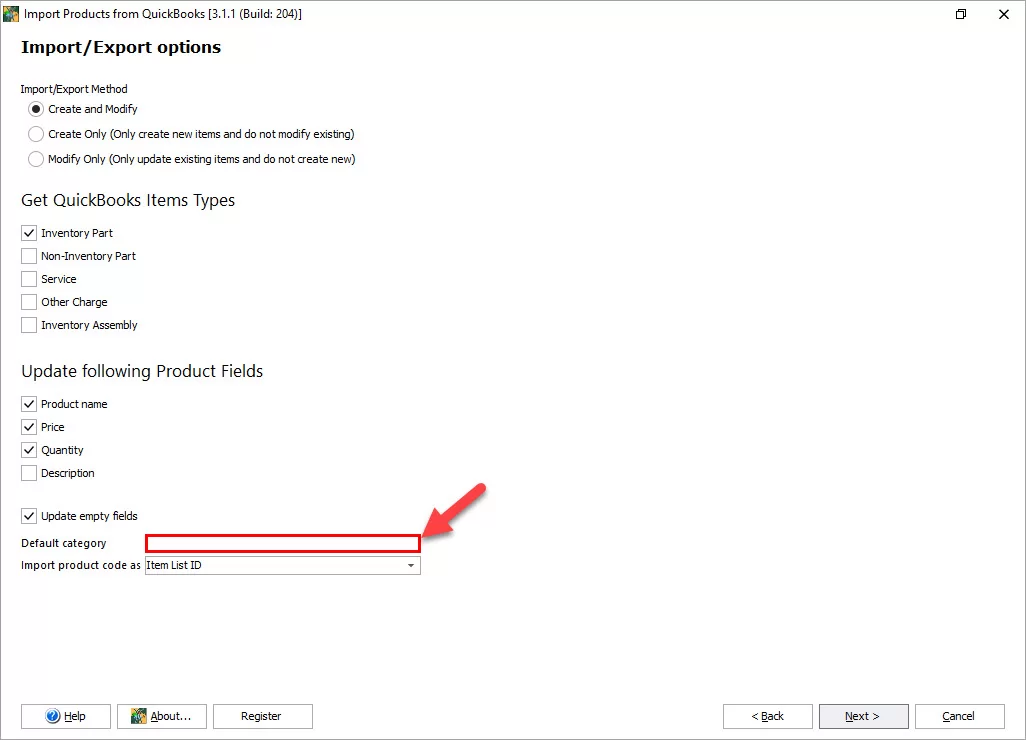
If there is a category with such a name in your WooCommerce store already, the products will be imported into it.
If your store doesn’t have a matching category, Store Manager will create it on the go.
And finally, specify the Quickbooks field (Item Name or Item List ID) that will be imported as a SKU into WooCommerce.
If you import QuickBooks Item Name into a WooCommerce SKU field, and if there is a product with a matching SKU, it will be updated or skipped during import (depending on the Import/Export method selected at the previous step).
After you’ve specified all settings, press “Next” and check the preview. If everything is correct press “Import”:
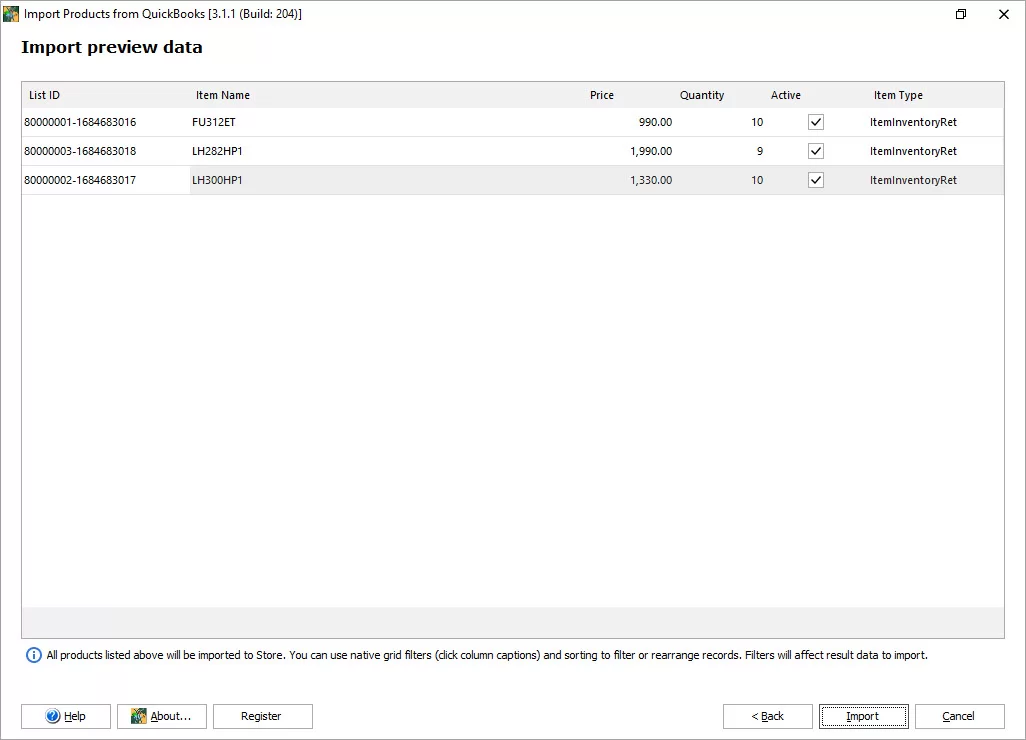
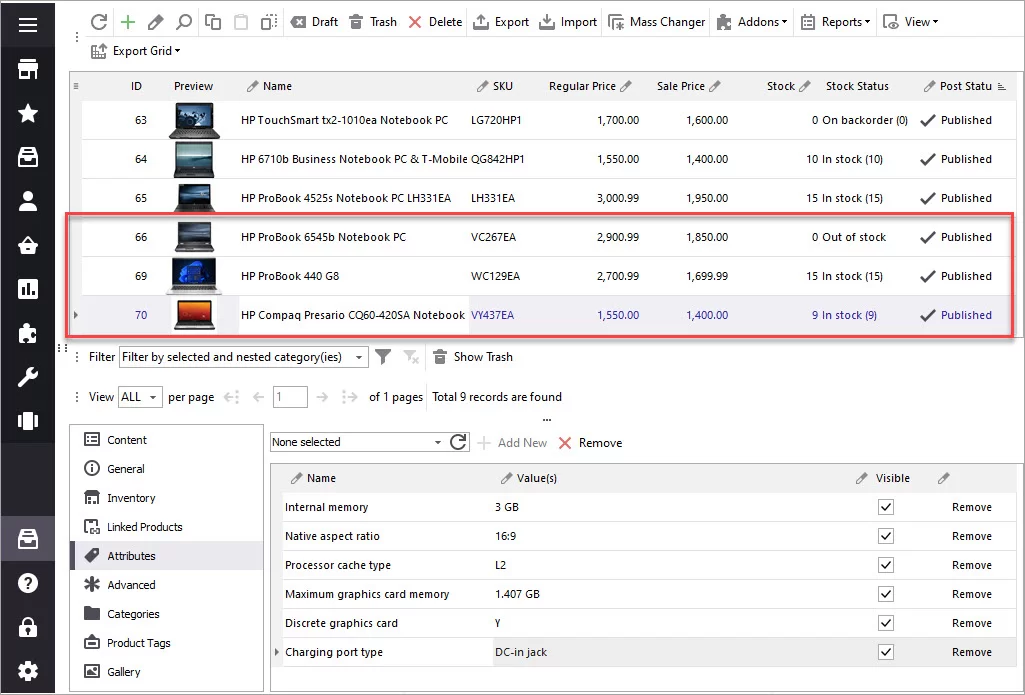
In the last step, look through the import details and click “Finish” to close the Wizard. Now you can check the data in Store Manager:
The Bottom Line
QuickBooks Integration in Store Manager for WooCommerce helps you sync product data between two systems automatically and avoid manual data entry. Use the addon to export products from your store to QuickBooks and import them when necessary. Update hundreds of products at once and keep your inventory in order!